

This is the second part of a two part bread post requested by a reader. She asked how I make my breads. For this post I am using Suzanne McMinn's Grandmother bread recipe found at her website Chickens In The Road.com This is a good basic everyday simple bread recipe. Great to start out with because it has just a few simple ingredients yet makes a great simple white bread. This recipe is for 2 loaves although I make 3. Why? Because my family likes them smaller to fit in the toaster better : )
Proofing the yeast

In a heat safe bowl add 1 Tablespoon yeast (1 packet) and 1/4 cup sugar


In a few minutes you will start to see a foam on the top of your yeast.

Adding the flour

Now add your first 2 cups of flour and your salt. I am just using an all purpose flour. Stir until smooth.


Put dough in bowl and rotate dough and then turn over to get the oil on the outside of the dough.
First Rise


Set the oven timer for 1 hour and walk away. The heat and moisture from the boiling water help make a warm moist atmosphere for the dough to rise. This is your first rise.

With lightly floured hands knead dough down again to release all the air pockets. Now split the dough into three equal sections. Flatten one and roll with lightly floured hands on a lightly floured surface.


Take the remaining third and place in a greased or sprayed loaf pan. I like glass so I can see when the crust is done
Second Rise


While oven is preheating mix 1 egg and 1 Tablespoon milk in small bowl

Now brush loaves with egg milk mixture
Baking

Place loaves back in preheated 350 oven with water pan in bottom.

Bake for 35 minutes or until loaves tapped sound hollow.Remove from oven and set on rack to cool slightly before removing from pans. Brush warm crusts with melted butter.


You want the bottom of your loaf to be slightly brown also and sound hollow when tapped. Let cool before trying to remove from pan. Brush crusts with melted butter
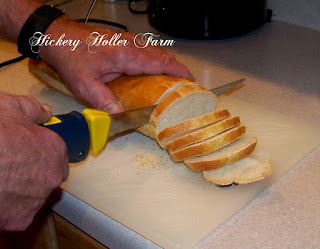
Slicing
 Allow bread to cool completely before attempting to slice. Best way to slice bread is with an electric knife. My husband slices my bread with his electric fish filet knife ; )
 The french bread is sliced to make garlic bread rounds to go with pasta dishes and put in plastic bags to freeze. Half of the loaf was left out to go with a pizza casserole that night. Just spread with butter and garlic bread sprinkles and broil for a few minutes on a cookie sheet.
 And I have plenty of garlic bread in the freezer for my spaghetti and lasagna this month.
 The loaf of white sandwich bread was used for egg salad sandwiches for lunch the next day.
 A couple of notes! Try painting my homemade non stick coating on your bread pans with a pastry brush it works great and is cheap to make and shelf stable. Find the recipe HERE
 The reason you cooked the two french bread loaves first is because they rose quicker because the pan is lighter with holes in it so the warm moist air penetrates better. You can see the holes in the pan here. The solid glass loaf pan is thicker and therefore it took longer to rise so was allowed to rise a little longer and cook later.
This concludes my two part bread post and I hope this helps.
Blessings from The Holler
The Canned Quilter


This concludes my two part bread post and I hope this helps.
Blessings from The Holler
The Canned Quilter
You husband had a fantastic idea! My problem is always slicing the bread.
ReplyDeleteThanks so much, CQ! I always enjoy your posts. :)
ReplyDeleteP.S. The link to your home made non-stick coating takes me to the Chickens in the Road bread post. ;-)
ReplyDeleteThanks for the heads up and it is fixed !
DeleteThank you! Have a wonderful day, CQ! :-)
DeleteI am starving Now! Have a blessed day!
ReplyDeleteI have made yeast bread since I can remember and have always done the sugar/yeast thing but never knew it was "proofing the yeast". Granny told me when I started, it gave the yeast a head start...the things kids will believe!
ReplyDeletewonderful two part series. I use a simple recipe by Justin Wilson.
Any recipe of Justin's is good in my book. Growing up in Southeast Louisiana he was a dear family friend and I have such fond memories of him visiting my parents home and my family visiting his home. He was a true southern gentleman and a great cook to boot.
DeleteI love making bread. I miss it but now that I'm retired and have all this free time, ha! Maybe I can make some again.
ReplyDeleteMade this yesterday using my new French bread pan that I got for Christmas. Sure turned out yummy!
ReplyDelete